React 대시보드
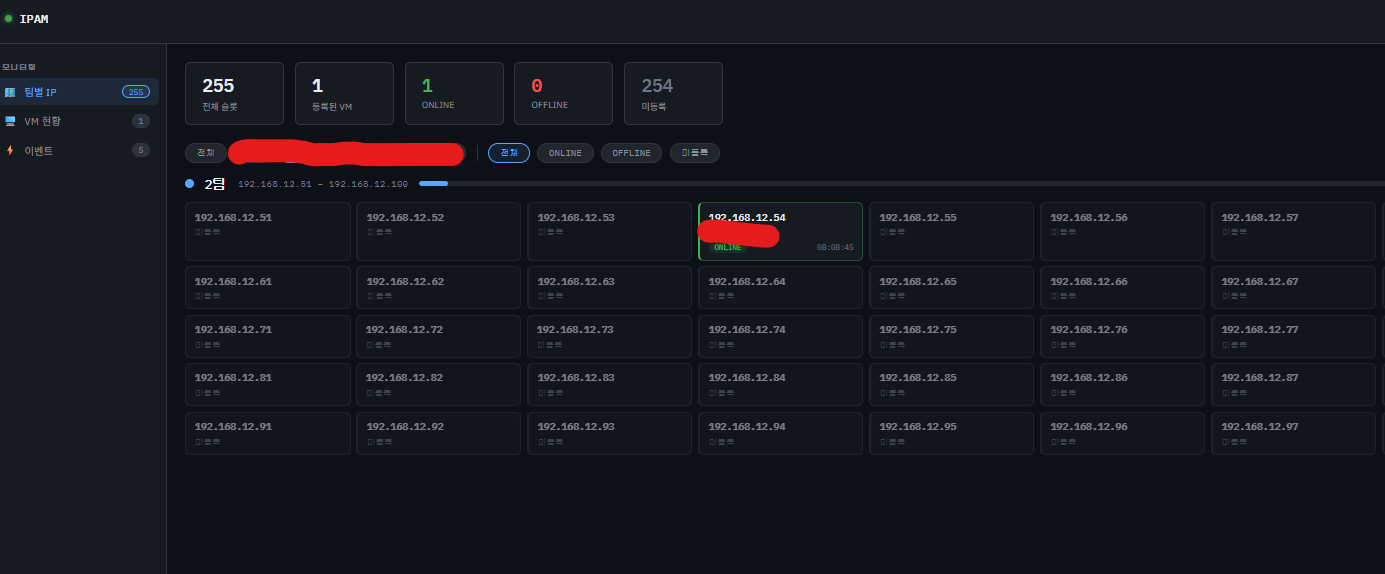
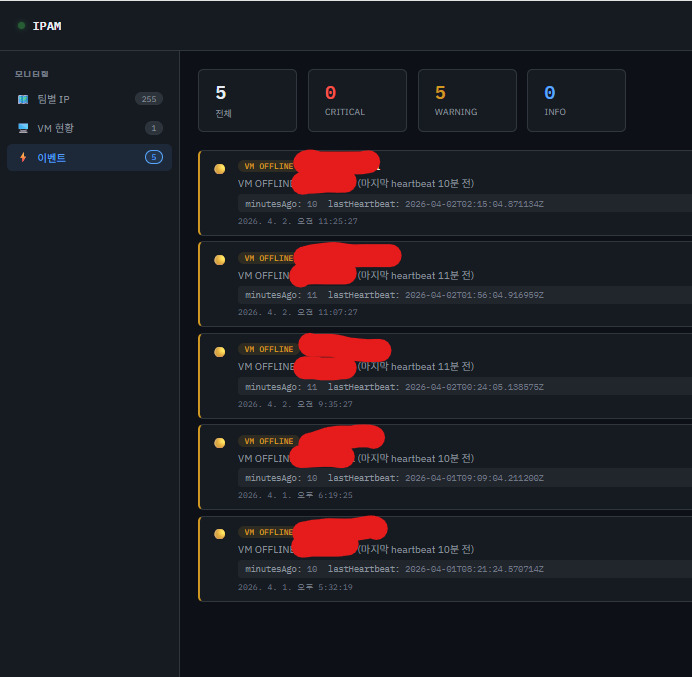
대시보드는 탭 2개로 구성된다.
- VM 목록 — 전체 VM 현황, 상태별 필터, ONLINE/OFFLINE/UNKNOWN 배지
- 이벤트 로그 — IP 충돌, IP 변경, 오프라인 이벤트 타임라인
WebSocket이 아닌 30초 폴링으로 구현했다. VM 상태가 초 단위로 바뀌지 않고, 운영 대시보드 특성상 약간의 지연은 허용된다. 심플하게 가는 게 낫다고 판단했다.
30초 폴링 훅
// usePolling.js
import { useEffect, useRef } from 'react';

export function usePolling(callback, intervalMs = 30_000) {
  const callbackRef = useRef(callback);

  useEffect(() => {
    callbackRef.current = callback;
  });

  useEffect(() => {
    callbackRef.current(); // 마운트 시 즉시 1회 실행

    const id = setInterval(() => callbackRef.current(), intervalMs);
    return () => clearInterval(id);
  }, [intervalMs]);
}
// App.jsx
const [vms, setVms] = useState([]);
const [loading, setLoading] = useState(true);

usePolling(async () => {
  const data = await fetch('/api/vms').then(r => r.json());
  setVms(data);
  setLoading(false);
}, 30_000);
callbackRef를 쓰는 이유는 setInterval 클로저가 최초 등록 시점의 callback을 계속 참조하는 문제를 피하기 위해서다. useRef로 항상 최신 콜백을 가리키도록 한다.
VM 목록 테이블
// VmTable.jsx
const STATUS_BADGE = {
  ONLINE:  { label: 'ONLINE',  className: 'badge-green'  },
  OFFLINE: { label: 'OFFLINE', className: 'badge-red'    },
  UNKNOWN: { label: 'UNKNOWN', className: 'badge-gray'   },
};

export function VmTable({ vms, filter }) {
  const filtered = useMemo(() => {
    return vms.filter(vm => {
      if (filter.status && vm.status !== filter.status) return false;
      if (filter.team && vm.teamId !== filter.team) return false;
      if (filter.search) {
        const q = filter.search.toLowerCase();
        return (
          vm.hostname?.toLowerCase().includes(q) ||
          vm.currentIp?.includes(q)
        );
      }
      return true;
    });
  }, [vms, filter]);

  return (
    <table className="vm-table">
      <thead>
        <tr>
          <th>호스트명</th>
          <th>IP</th>
          <th>팀</th>
          <th>상태</th>
          <th>마지막 heartbeat</th>
          <th>에이전트 버전</th>
        </tr>
      </thead>
      <tbody>
        {filtered.map(vm => {
          const badge = STATUS_BADGE[vm.status] ?? STATUS_BADGE.UNKNOWN;
          return (
            <tr key={vm.id}>
              <td>{vm.hostname}</td>
              <td><code>{vm.currentIp}</code></td>
              <td>{vm.teamName ?? '-'}</td>
              <td><span className={`badge ${badge.className}`}>{badge.label}</span></td>
              <td>{formatRelative(vm.lastSeenAt)}</td>
              <td>{vm.agentVersion}</td>
            </tr>
          );
        })}
      </tbody>
    </table>
  );
}
이벤트 로그 패널
// EventLogPanel.jsx
const SEVERITY_CLASS = {
  CRITICAL: 'event-critical',
  WARNING:  'event-warning',
  INFO:     'event-info',
};

const EVENT_ICON = {
  IP_CONFLICT:    '🔴',
  IP_CHANGED:     '🔄',
  IP_OUT_OF_RANGE:'⚠️',
  VM_OFFLINE:     '🔴',
  VM_ONLINE:      '🟢',
};

export function EventLogPanel({ events }) {
  return (
    <div className="event-log">
      {events.map(evt => (
        <div key={evt.id} className={`event-item ${SEVERITY_CLASS[evt.severity]}`}>
          <span className="event-icon">{EVENT_ICON[evt.eventType]}</span>
          <span className="event-time">{formatDate(evt.createdAt)}</span>
          <span className="event-msg">{evt.message}</span>
        </div>
      ))}
    </div>
  );
}
다크/라이트 테마
/* App.css */
:root {
  --bg: #ffffff;
  --surface: #f8f9fa;
  --text: #1a1a1a;
  --border: #e0e0e0;
  --badge-green: #22c55e;
  --badge-red: #ef4444;
  --badge-gray: #9ca3af;
}

[data-theme="dark"] {
  --bg: #0f172a;
  --surface: #1e293b;
  --text: #e2e8f0;
  --border: #334155;
}
// App.jsx
const [theme, setTheme] = useState(
  () => localStorage.getItem('ipam-theme') || 'light'
);

useEffect(() => {
  document.documentElement.setAttribute('data-theme', theme);
  localStorage.setItem('ipam-theme', theme);
}, [theme]);
client nginx 설정
React SPA를 서빙하면서 /api/ 요청을 Spring Boot로 프록시한다.
server {
    listen 80;
    root /usr/share/nginx/html;
    index index.html;

    location /api/ {
        proxy_pass http://app:8080;
        proxy_set_header Host $host;
        proxy_set_header X-Real-IP $remote_addr;
    }

    location / {
        try_files $uri $uri/ /index.html;
    }
}
Docker Compose
services:
  postgres:
    image: postgres:16-alpine
    container_name: ipam-postgres
    environment:
      POSTGRES_DB: ipam
      POSTGRES_USER: ipam
      POSTGRES_PASSWORD: ${DB_PASSWORD}
    volumes:
      - ./data/postgres:/var/lib/postgresql/data
      - ./sql/init.sql:/docker-entrypoint-initdb.d/init.sql
    healthcheck:
      test: ["CMD-SHELL", "pg_isready -U ipam -d ipam"]
      interval: 5s
      timeout: 5s
      retries: 10

  redis:
    image: redis:7-alpine
    container_name: ipam-redis
    healthcheck:
      test: ["CMD", "redis-cli", "ping"]
      interval: 5s
      timeout: 3s
      retries: 5

  app:
    build: ./backend
    container_name: ipam-app
    ports:
      - "8080:8080"
    environment:
      DB_HOST: postgres
      DB_NAME: ipam
      DB_USER: ipam
      DB_PASS: ${DB_PASSWORD}
      REDIS_HOST: redis
      SLACK_WEBHOOK_URL: ${SLACK_WEBHOOK_URL:-}
    depends_on:
      postgres:
        condition: service_healthy
      redis:
        condition: service_healthy
    healthcheck:
      test: ["CMD-SHELL", "curl -f http://localhost:8080/actuator/health || exit 1"]
      interval: 10s
      timeout: 5s
      retries: 12
    restart: unless-stopped

  frontend:
    build: ./frontend
    container_name: ipam-frontend
    ports:
      - "3000:80"
    depends_on:
      app:
        condition: service_healthy
    restart: unless-stopped
init.sql을 /docker-entrypoint-initdb.d/에 마운트하면 PostgreSQL 컨테이너 최초 실행 시 자동으로 실행된다. 스키마를 자동으로 생성해주므로 별도로 CREATE TABLE을 실행하지 않아도 된다.
backend Dockerfile
Spring Boot는 빌드가 필요하다. 멀티스테이지 빌드로 최종 이미지에 Maven/JDK 빌드 도구가 포함되지 않도록 한다.
# 빌드 스테이지
FROM maven:3.9-eclipse-temurin-21 AS build
WORKDIR /app
COPY pom.xml .
RUN mvn dependency:go-offline -q
COPY src ./src
RUN mvn package -DskipTests -q

# 실행 스테이지
FROM eclipse-temurin:21-jre-alpine
WORKDIR /app
COPY --from=build /app/target/*.jar app.jar
EXPOSE 8080
ENTRYPOINT ["java", "-jar", "app.jar"]
dependency:go-offline을 먼저 실행해서 Maven 의존성을 레이어로 캐싱한다. 소스 변경 시 의존성 다운로드를 재실행하지 않아서 빌드가 빠르다.
frontend Dockerfile
FROM node:20-alpine AS build
WORKDIR /app
COPY package*.json ./
RUN npm ci --silent
COPY . .
RUN npm run build

FROM nginx:alpine
COPY --from=build /app/dist /usr/share/nginx/html
COPY nginx.conf /etc/nginx/conf.d/default.conf
EXPOSE 80
CMD ["nginx", "-g", "daemon off;"]
배포 명령어
# 환경변수 파일 작성
cat > .env << EOF
SLACK_WEBHOOK_URL=https://hooks.slack.com/services/...
EOF

# 최초 배포
cd ipam-system
docker compose up -d --build

# 로그 확인
docker logs ipam-app -f
docker logs ipam-frontend -f

# 백엔드만 재배포
docker compose up -d --build app

# 프론트엔드만 재배포
docker compose up -d --build frontend
트러블슈팅
Spring Boot healthcheck curl 없음
eclipse-temurin:21-jre-alpine에는 curl이 없어서 CMD curl -f ...가 실패했다.
# 실패
test: ["CMD", "curl", "-f", "http://localhost:8080/actuator/health"]

# 해결: CMD-SHELL로 변경 (sh -c 경유)
test: ["CMD-SHELL", "curl -f http://localhost:8080/actuator/health || exit 1"]
alpine 이미지에는 sh가 있어서 CMD-SHELL을 쓰면 sh를 통해 명령이 실행된다. curl 설치를 Dockerfile에 추가하거나, wget이 있다면 wget으로 대체하는 방법도 있다.
Spring Boot 시작 시간 + healthcheck
Spring Boot가 완전히 뜨기까지 20~30초 걸린다. retries: 12, interval: 10s로 설정해서 최대 2분을 대기한다. 이 시간 안에 spring이 안 뜨면 컨테이너가 unhealthy로 전환된다.
init.sql 재실행 안 됨
PostgreSQL 컨테이너는 /var/lib/postgresql/data가 비어있을 때만 initdb를 실행한다. 볼륨이 남아있으면 init.sql이 재실행되지 않는다. 스키마를 수동 적용하거나 볼륨을 삭제해야 한다.
# 볼륨 삭제 후 재시작 (데이터 초기화 주의)
docker compose down -v
docker compose up -d --build
마무리
4편에 걸쳐 IPAM VM 관리 시스템을 만든 과정을 정리했다.
| 편 | 내용 |
|---|---|
| 1편 | 기획 배경 + 전체 아키텍처 + DB 스키마 |
| 2편 | Node.js 에이전트 → Go 에이전트 전환 |
| 3편 | Spring Boot Heartbeat 처리 + 이상 감지 + Slack 알림 |
| 4편 | React 대시보드 + Docker Compose 배포 ← 지금 여기 |
핵심은 두 가지다.
MAC 주소 기반 VM 식별 — IP는 바뀌지만 MAC은 고정이다. IP를 기준으로 삼으면 VM이 IP를 바꿀 때마다 새 VM으로 등록되는 문제가 생긴다.
에이전트는 최대한 가볍게 — Go 단일 바이너리 6 MB로 Node.js 45 MB 대비 크기를 87% 줄였다. 배포하기 쉬울수록 VM이 늘어나도 관리가 편하다.
현재 인사정보 시스템과 연동해서 VM 담당자가 퇴사했을 때 자동으로 알림이 오는 흐름을 구성할 예정이다.